


|
|
|
|
|
|
| Rack
Design |
The
System |
Stacking
Keyboards |
Polysynths |
System
Diagram |
| Rack
Cases/Management |
Effects |
Cartage |
MIDI Configurations |
Epilogue |
wall wartpower supplies. Wall warts made cheaper product possible - they were used as an external power source to get around UL requirements for high voltages in an enclosed box and eliminate an expensive development process. Unfortunately wall warts are unreliable and not rugged enough for the rough rigors of the road. Since I had devices that required external power sources, I eliminated all the wall warts with a Juice Goose 12Paq. The 12Paq can supply low voltage sources such as 9VDC and 12VDC (both polarities), plus 9VAC (which can be configured to supply 18VAC if you know what you're doing). I planned one rack to contain all devices requiring low voltage sources in the same rack as the 12Paq. I bought a new one for my studio years ago and it has proven so reliable that it was the optimal tool for the stage system. Today the 12Paq is no longer made so I acquired a used one which required some restoration. The power outputs are on RJ45 interconnects similar to computer network ports, and I already knew the wiring for the 12Paq so I could build my own cables.
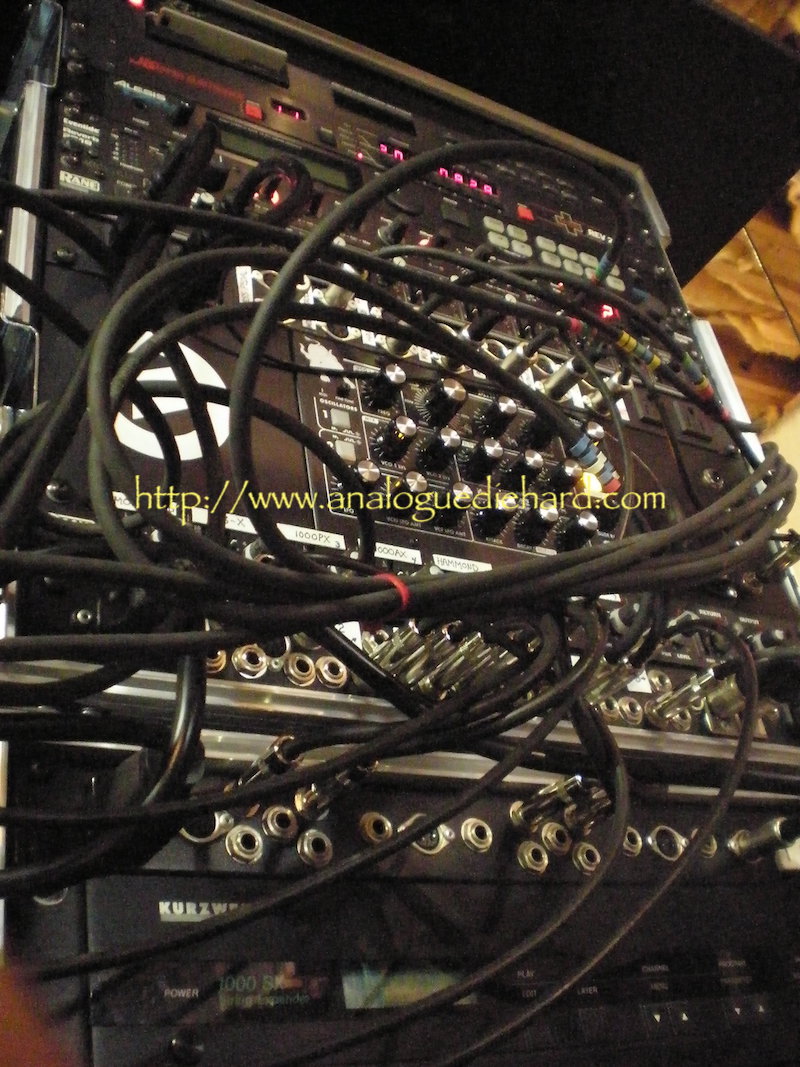
| I built the I/O panels which
are arranged in each set of 8U/12U rack so that they are in
close proximity when the racks are stacked. That permits
interconnect cables between racks as short as possible which
reduces the tangle of longer cords. See the images below for a better illustration of the I/O panel arrangement. |
 |
| without cables |
 |
| with cables |
 |
|
 |
 |
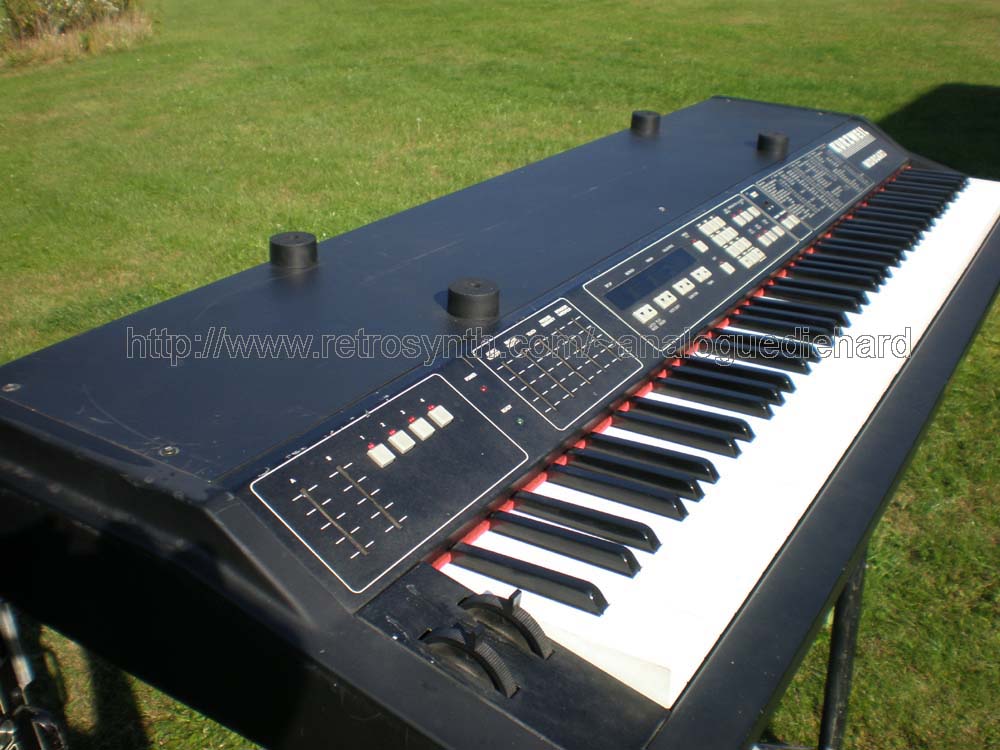
| Since this was going to be a MIDI controlled
system, my Kurzweil
MIDIBoard was designated as the master MIDI
controller. Besides a controller for playing, it can
configure my entire system for each song. This would include
sound patches, effects, MIDI matrix routing, etc. For each
sound patch I can configure volume, variations in envelope
and filter settings, etc over MIDI. The MIDIBoard also has
the best feeling action I have ever played, which is
important to the piano player in me. This is the "2nd" MIDIBoard I acquired used online for road use. It had suffered a blunt impact from something which sheared off the slidepot shafts. New ones were not available, so I conjured up a solution 1) use the PolyPedal sweep pedals to replace the two "Slider A" and "Slider B" controls 2) the five "Attack Velocity", "Release Velocity", "Touch", "Pressure Sensitivity", and "Retrigger Threshold" slidepots can be programmed with each setup in the MIDIBoard. The MIDIBoard is carted in a strong ATA compliant road case. |
 |
 |
| I wanted to minimize setup/breakdown time by
consolidating multiple footswitches and sweep pedals used
with the MIDIBoard. My Moog Polypedal hadn't seen much use
as I no longer used it with the Polymoog
so I decided it would be the perfect footpedal solution, as
everything I needed was in one unit and it could eliminate
multiple cables with a single multicore cable. Being a heavy
road-rugged unit, it also doesn't slip away from your feet
like individual pedals do. I rewired the PolyPedal to work
with the MIDIBoard which connects through a single
multiwire cable. Even though I gigged the Polypedal since 1985 without a case, this time around I acquired a new Anvil case for it. |
 |
 |
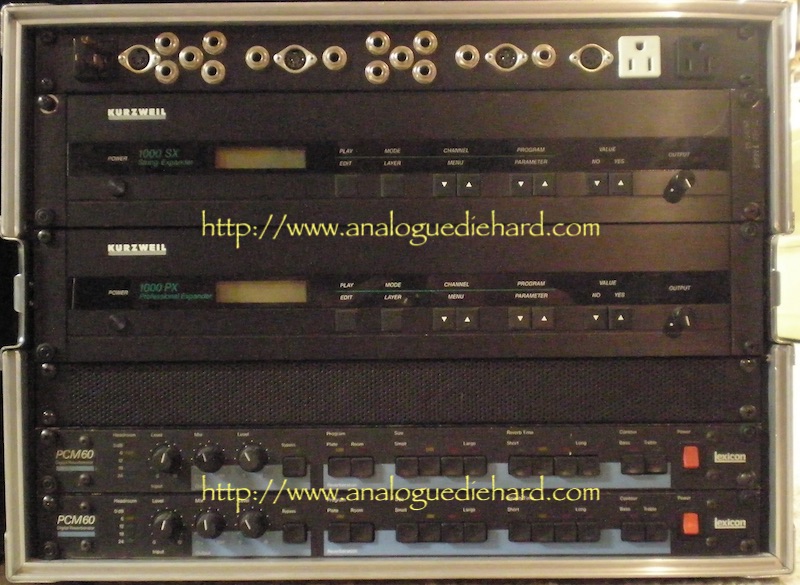
| First rack on the design table is the Kurzweil Rack (aka
"Bread-n-Butter" Rack) as seen above. For the
"bread-n-butter" sounds (again, zero learning curve and
known reliability history) I elected for the Kurzweil
1000 romplers which can also be found cheap on the
used market. I bought a 2nd 1000PX to provide the percussive
family sounds such as APs, EPs, guitars, basses, percussion,
harps, vibes, and choirs; a 2nd 1000SX to provide strings,
winds, reeds, brass, tympani, and other orchestral
instruments. That's pretty darn near a complete orchestral
sampler system! The 1000 units I bought did not have the
latest OS so I copied the OS and soundblocks from my
existing units (while I had them out of the racks, I also
performed periodic replacement of the patch backup
batteries). I copied the studio configurations and patches
to the road units, then modified the MIDI mapping slightly
for the offsite system. The new OS and soundblocks for the
1000SX actually comprises a 1000AX system, so I combined my
1000SX and 1000HX patches into a single library - this
barely fit into the RAM capacity on the unit. These boxes require reverb effects which are discussed here. |
 |
 |
| For offsite studio sessions, I designed the I/O panel on the rack to get the raw sounds without effects. I also included I/O for the digital reverbs so they were available as separate processors (for off-site studio work), and inserts so I could patch pre-delays for the reverbs. |  |
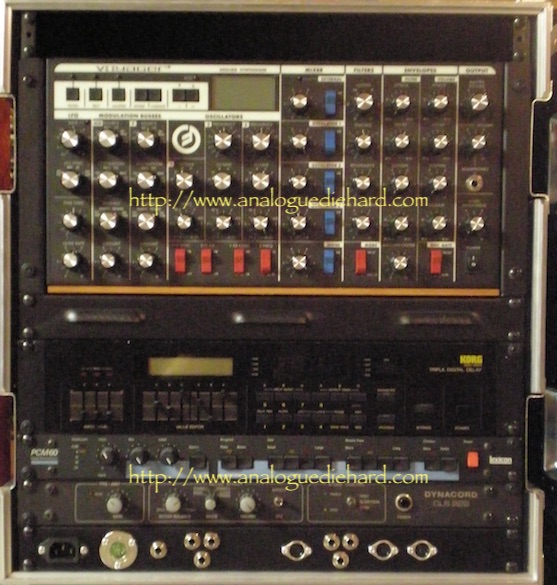
| Next up is the Base Analog Rack. This is named because it
is the base component for MIDI control, and since expansion
was going to involve all the modules and analog synthesizers
it contains the mixers for such. This contains the core components of the stage rig - mixers, MIDI matrix control, sequence playback (I refuse to use a laptop or mobile on stage), SYSEX backup, and module essential for rhythm. My preference for line level mixers have been Rane SM82 as they are clear & transparent, and they can be chained as your system grows. For sequence playback and SYSEX backup I chose the Alesis Datadisk - it uses floppy disks but no one has made a MIDI accessory like this with newer memory like USB sticks! Proving again that old stuff fits the bill, I use a JL Cooper MSB+ for a programmable MIDI matrix. Most of these are duplicates of my studio system, and I prefer to minimize the learning curve of new devices. Since most of these devices use external power supplies, I placed the Juice Goose 12Paq in this rack. None of the other racks have any need for external power supplies. Components:
|
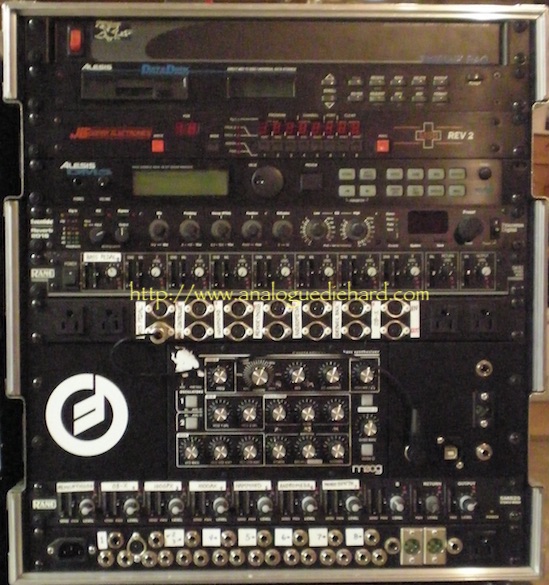 |
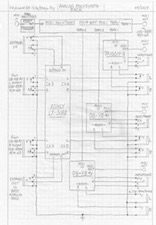
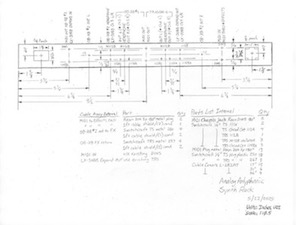
| This is the panel layout and wiring
diagram... probably the most dense panel design I have
built. Some of those jacks were a tight fit! Basically it is the eight channel inputs for the SM-82 and the stereo L/R balanced outputs to the FOH. The EXPAND IN is for a future line mixer, and the MONITOR OUT is a summed mono keyboard output to my stage monitor, independent level from the FOH outputs. Other than the Hammond input (channel 5) and Drums (channel 8), the SM82 mixer input jacks are TRS stereo or separate L/R jacks with Left serving as L/Mono with nothing plugged in the right input jack. It's all done through the normaling action on the jacks.; I started using TRS I/O for stereo signals between keyboards and racks which reduces cabling and setup time by half. It has actually changed three times since its initial build. This 3rd change moved the Dynacord CLS-222 Leslie Simulator to this rack because I decided that Hammond organ should be part of the base system, not an expansion. While I do own a real Leslie cabinet, it is heavy and bulky enough that I can't justify lugging it around unless the genre requires a lot of Hammond playing. Also a Leslie takes up stage space and requires miking. Simulating the effect of a rotating speaker is extraordinarily difficult (most simulators are adequate for guitarists but not for Hammond organ), but the Dynacord CLS-222 delivers a very convincing rotating speaker effect in a rackmount 8lb package that does not require micing. The CLS-222 has long been out of production but it is still the standard against which other simulators are measured against. I grew tired of the bulky fragile 11pin interconnect system on my Hammond organs - the connectors are breakable plastic for which no rugged metal shell replacement is available, so I designed a replacement interconnect using 3/16in TRS Switchcraft connectors which are far more reliable, and easier to integrate into this panel. The 3/16in TRS jack is not a stereo audio TRS interconnect and the smaller barrel diameter was chosen to prevent a 1/4in stereo TRS insertion. |
 |
|
| Moog Synamp |
Bose 802 |
QSC KW122 |
 |
 |
 |
| I added these four rubber glides to the top of the MIDIBoard... | |
| ...for placing the Hammond XK3 on top... | 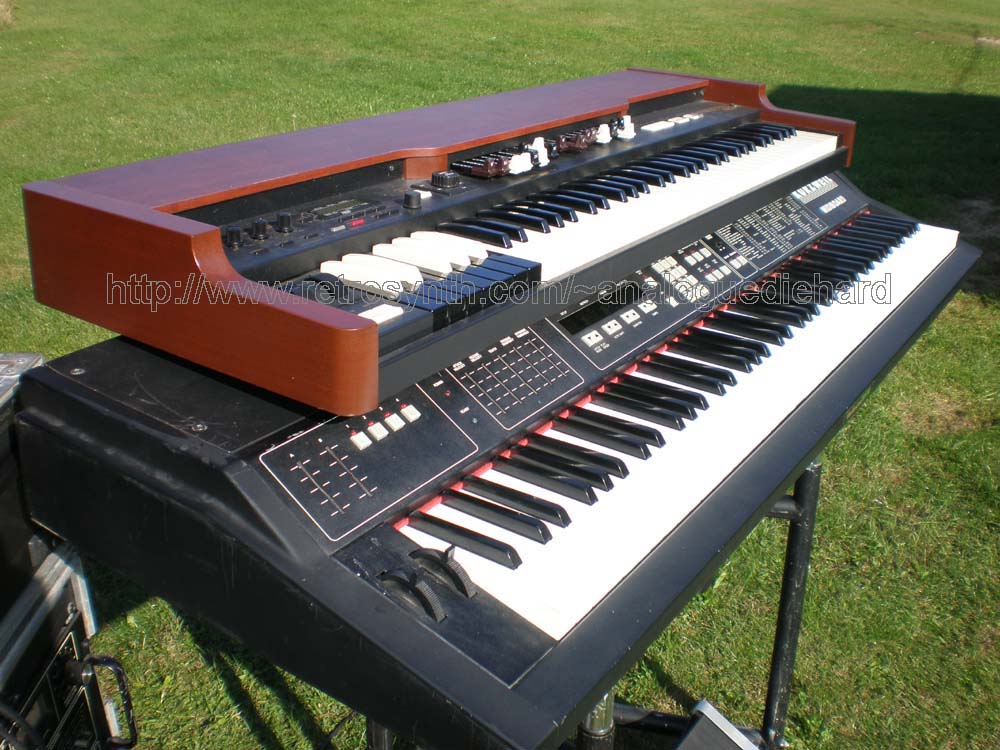 |
| The racks are designed to
double as a keyboard stand. Since no one makes a tabletop
keyboard support system with tiers, I had to build one. The
base frame is fabricated out of 2x4 pine, and I used bare
tiers from K&M. This is an old configuration; I am currently building a new PolySynth rack to replace the Andromeda and OBX, reducing the keyboards from four to two. |
|
Components:
|
 |
| Components: universal analog synthesizer multi-effect system (see below) | 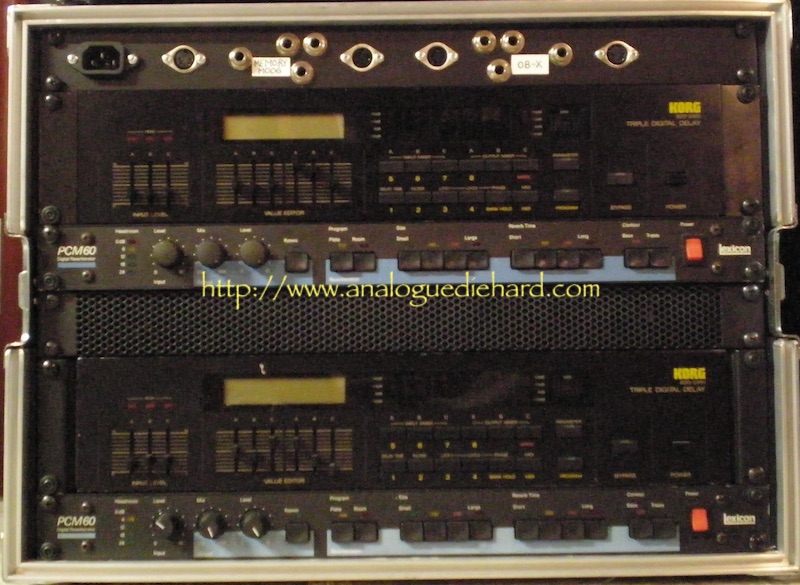 |
| The goal of replacing the Andromeda with the
OB-X8/Trigon-6 modules is to eliminate a keyboard to cart
around and to bring in devices that are reliable (the
Andromeda is starting to show its age by crashing in the
middle of a song at least once a night). In order to
accomplish that I need a rack for the modules. The
problem is, the modules are too wide for 19in racks and
because they are desktop formats they can't be mounted like
a standard rack device because the rear panel jacks are such
that the plugs protrude upwards and they waste rack spacing. So I need a special "rack" built for the polysynth modules, and they will reside on sliding drawer shelves for best use of rack spacing.; When I need to develop sounds, I just pull out the module I need to edit. While performing, the shelves are kept inside. At the bottom of the rack, I will fill out the width for accommodating two 19in rack devices - the I/O panel (shown at the right), and the Ashly LX-308B line mixer (the only 1U line mixer comparable to the now discontinued Rane SM-82). The rack will be the same height as the 12U Minimoog rack. On the I/O panel, the audio outputs of the "split" OB-X8 #2 were positioned to align with the input jacks of the Analog Polysynth Effects Rack - again, short audio cables & fast setup.; This I/O panel was a challenge to design. At present I have other priorities so I have not yet built this rack. In the interim I will be duplicating patches in the modules. |
 |
 |
| This diagram of the full
system shows the maximum I could conceivably need. There are
certainly situations where I don't need all of this, I only
take what I need. Everything I could potentially need for
the stage and for any genre. IE Southern rock would not need
the analog synths. Despite the appearance, it is not that complex and it sets up easy. My interconnect cables are between 10 and 36 inches long, and for each stereo signal instead of dual cables I chose a single two conductor cable with TRS connectors. This convention speeds up setup and teardown time. Since my keyboard duties tend to be dynamic, snakes are not a solution. I generalized audio and MIDI cables between controllers and racks into bundled sets, with separate sets for each external keyboard but not instrument specific. I designed the cable bundles to be 25ft long, for those events with multiple bands which require fast band change in/out. With the long cable bundles I just leave the racks offstage and only switch the keyboard in and out. This has worked for events like those. Of all the stage MIDI systems I have built, these racks are actually the LIGHTEST I have put together. |
|
legacyera Lexicon stuff like the PCM60 and 224/200/300/480. Those old Lexicons just work right, it is hard to make a bad sound with those. Very few modern FX came close to those Lexicons, and certainly not the budget effect units. You get what you pay for..
skeletonMIDIBoard configuration that allows me to quickly build configurations for songs. I can add
modifiersto the default configuration as needed (IE change MIDI Matrix to route Taurus pedals to trigger Andromeda sounds). All of my MIDIBoard configurations are compiled in a spreadsheet from which I can print out a table listing songs and their associated setups. Thus if the band chooses to deviate from the set list, I am ready.
processorsare available for filtering, shifting MIDI channels, transposing MIDI notes, etc. Current tools can do the same thing, but they require a host computer (I REFUSE to use a laptop on stage) and they are not rack mount. Keeping a MIDI system free of glitches is a challenge and requires some pre-planning. Chasing down a malfunctioning MIDI device can put a few grey hairs on your head! One of my first prerequisites was to restrict the Andromeda to MIDI Note on/off and program change messages, so I used one of the MSB+
processorsfor that task. With the intense power of MIX mode on the Andromeda, I didn't want a stray MIDI controller messing with it. Since The Moog Taurus II is a static controller (fixed MIDI channel and note numbers), I employ the other
processorto transpose note numbers and shift the MIDI channels when I want to control other MIDI devices from my feet. I can even layer Taurus pedal sounds with other sounds (Taurus layered with Grand Piano is way cool).
| This has turned out to be an EXTREMELY powerful system. A lot of planning went into this system and it works great - why didn't I think of this years ago?!? |  |
|
