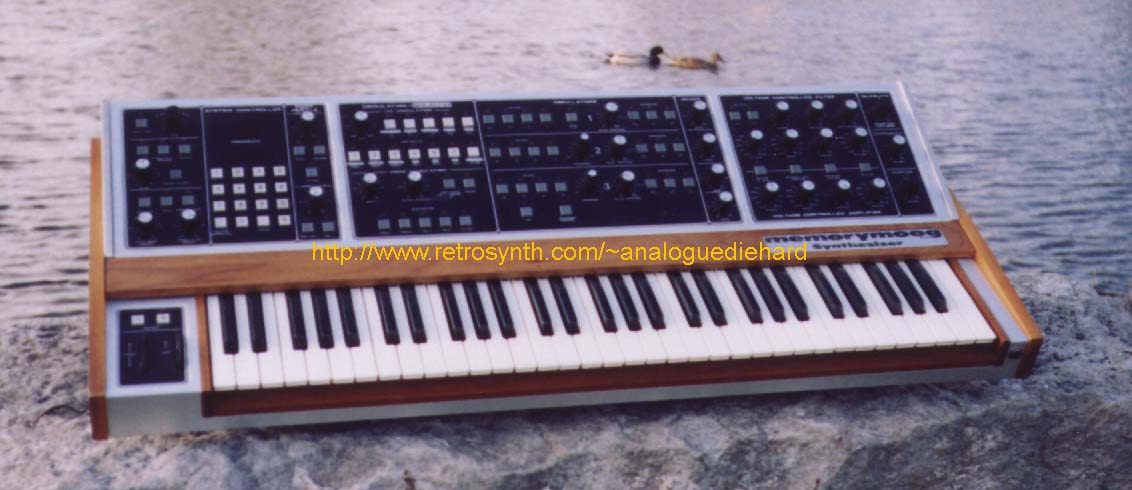
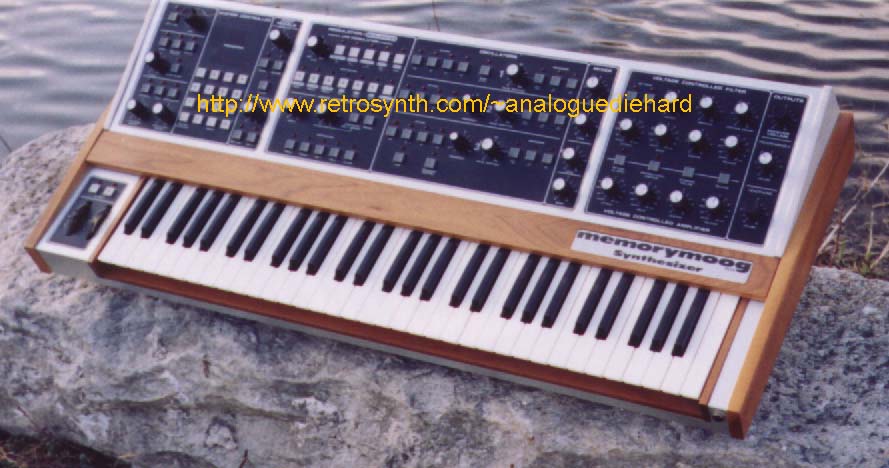
Moog Memorymoog Plus analog polyphonic synthesizer
Last Update
10-11-2017
The Memorymoog is both a landmark and a low point in the history of
Moog synthesizer instruments. While its position in the list of
top ten fattest analog synthesizers is deserving, so is its reputation
of unreliability. Age has not been kind to Memorymoogs, largely
due to oxidation on the internal PC board connectors. The
Memorymoog is chock full of them and they are the achilles heel of the
beast in that they are the primary source of tuning foibles.
Other causes of malfunctions are dirty keyboard contacts and faulty
solder joints on the voiceboard trimpots. Owning a Memorymoog is
like owning a Triumph automobile - the price of admission is the high
maintenance.
I purchased my unit direct from the factory in 1985 when all
synthesizer production had ceased thanks to the Yamaha DX-7. I
owned a Polymoog then and when I found out that the factory was a mere
one hour drive from my college, I called and arranged a visit. I
got a nice tour of the place and I learned they were clearing out
inventory, so I bought a brand new Memorymoog for $1000 - a bargain
back then and a bargain today. Mine is actually an early
Memorymoog with the sequencer added along with the reliability
upgrades, and it has a new serial number on it. I know this because the
serial # on the LH control board is lower and they added the sequencer
overlay over the original.
Moog had pioneered the polyphonic market with the release of the
Polymoog in 1975. Then the assignable voice polyphonics that
followed - Oberheim FVS Four Voice SEM in 1975, Yamaha CS-80/60/50 in
1976, Prophet-5 in 1977, Oberheim OB-X in 1979 - showed the world the
superior implementation of polyphonic synthesis. The major
difference is that the Polymoog is a top octave divider
system while the assignable voice system was capable of far more
sounds. The reason for the limited palette of the Polymoog's top
octave divider system (TOS) is because it cannot implement voice
modulation - if you wanted to modulate the VCF or the PW using the
oscillator of an independent voice, you could not do it. Want to
modulate the pitch of an oscillator in a TOS? Can't be done.
Moog had their share of teething problems with the Polymoog and it
became an orphan with the competing synths. It also gained a
reputation of unreliability (it is the rare Polymoog that is 100%
functional today and few repair shops will touch them). Moog
finally gave in and released the Memorymoog in 1982 - a pretty late
entry in an already crowded market! Alas, before the Memorymoog
could establish a foothold, the Yamaha DX-7 effectively killed the
analog synthesizer market in one sweep.
The Polymoog was my first endeavor in polyphonic synthesizers but it
didn't take long to learn of its limitations. The Memorymoog was
a
worthy successor to the Polymoog in that it was a proper
polyphonic.
The major difference is that the Polymoog is a top octave divider
system while the Memorymoog is a assignable voice system which is the
superior design. There are a lot of tricks in the Memorymoog that
is
not possible in the Polymoog, chief among them voice modulation.
That is why the Memorymoog has a broader palette of sounds over the
Polymoog. top
Sounds
The palette of sounds from the Memorymoog are
impressive. Its filter and modulation options can conjure up strings, brasses, and pads that most
users are familiar with. By using filter FM tricks via voice
modulation some good clavinet
sounds can be dialed up. Flutes and percussive sounds are also a
specialty.
On the synthesizer palette the Memorymoog delivers a-plenty.
Check out this filter sweep. My particular model has the
upgrade
for the noise source
to eliminate the periodic "heartbeat".
Effects - no problem.
The Memorymoog is one of the few polysynths
that is effective for lead
sounds because you can specify how many
voices in a unison monophonic patch, often one voice is effective for
lead sounds. If you like all six voices in
unison they can breathe some massive bass sounds, one of which demonstrates
filter EG routed to pitch for a great intro heard on the Scorpions live
record from the late 1980s.
Polyphonic
glide isn't something you find on many polysynths, and it's even
better combined with the HOLD button with chords you can play with one
finger. Some of the arpeggiator samples here
demonstrate both features in
powerful ways that can keep your kids entertained for hours (but this
is no Trix cereal so it's not for kids you silly rabbit).
One of my
favorite tricks I learned on
the Memorymoog is VCO3 configured as an LFO with its frequency tracking
the keyboard as heard here. It is especially effective for choir
patches.
All of the previous sound samples are dry with no effects
whatsoever, on a freshly calibrated unit. This one is processed
however, as it shows off the
massive pipe organ sound that I heard years ago when I saw Petra in
concert: Pipe
Organ: JS Bach - Come Sweet
Death
All
mp3s encoded with RazorLame. top
Versions
The original Memorymoog
was
introduced before MIDI. Last known factory firmware revision for
the non-plus Memorymoog was v2.4. In 1984 they offered a MIDI
retrofit that
included a polyphonic and monophonic sequencer, and the model became
known as the Memorymoog Plus.
Last known factory firmware revision for Memorymoog Plus was v4.1
(press C-0 for the "light show" - if the program LEDs display "85" then
this is firmware v4.1). Earlier firmware versions of Memorymoog
Plus can be quickly identified by pressing the arpeggiator button then
any of the numeric keys - if you do not see a descriptive display such
as "UP L" (up latched) then the firmware is earlier.
The factory MIDI implementation is extremely basic - note on/off and
program change. That's it! No mod wheel, pitch wheel,
volume, filter cutoff, MIDI clock sync - nothing! Not only that,
it operated in Omni mode which meant it responded to note commands on ANY MIDI channel - useless in a MIDI
rig!!! There was also a latency "delay" between key presses and
the voice being triggered. Since
production ceased in 1985, so did firmware upgrades. Also the
MIDI output on a stock Memorymoog had a bug that rendered it useless as
a MIDI controller - any key on the local keyboard generated a MIDI Note
On message for ONLY note #64!
The ultimate MIDI upgrade is Rudi
Linhard of Lintronics
in Germany where he
performs a comprehensive retrofit that improves the tuning reliability
and implements a modern world implementation of MIDI, including patch
dump over sysex and transmission of panel manipulations over
MIDI. This became
known as the Memorymoog LAMM (Lintronics Advanced MemoryMoog) and they are very valuable on
the used market today, if you can find one. Although the LAMM
upgrade removes the sequencer, the loss is not that great as the
sequencer is pretty rudimentary by todays' standards.
There used to be a "poor mans'
LAMM upgrade" called the dBm upgrade
which is no longer commercially available. This upgrade worked in
a Memorymoog
Plus only and with a replacement set of ROMs and some wiring changes
you got better MIDI features like Volume Controller, Mod Wheel, Pitch
Wheel, Foot Controller (for controlling filter cutoff, VCO2, among
others),
and got rid of the damn Omni mode. It also decreased the latency
"delay" between pressing a key and the voice triggered. While
this was a big improvement over the factory implementation, the dBm
upgrade still retained the bug of MIDI output (almost nobody uses a
Memorymoog as a MIDI controller anyhow).
I have provided ROM images and
upgrade documents for the dBm upgrade below - you will need (4) TI
TMS2532A
350ns (or faster) EPROMs
and an EPROM burner that can program them. Note that 2532 EPROM
pinouts vary between manufacturers and may not work in
Memorymoogs. You are on your
own with this upgrade and I do not have
these parts or tools so please do not email me.
Install documentation page 1
|
Page 1
|
EPROM binary image U2
(right-click and "Save Link Target As...")
|
U2 ROM
|
Install documentation page 2
|
Page 2
|
EPROM binary image U3 |
U3 ROM
|
Install documentation page 3
|
Page 3
|
EPROM binary image U4 |
U4 ROM
|
Install documentation page 4
|
Page 4
|
EPROM binary image U5 (sequencer
board)
|
U5 ROM
|
Install documentation page 5
|
Page 5
|
|
|
Install documentation page 6
|
Page 6 |
|
|
Install documentation page 7
|
Page 7 |
|
|
Install documentation page 8
|
Page 8 |
|
|
How do you tell the difference? On the original Memorymoog, the
buttons in the LFO
section
are all grey, the Memorymoog Plus are white. The telltale of a
Memorymoog LAMM is the rear
panel. On a dBm unit the display will read "DBM TECH" when
powered up.
There is also the "mysterious" Moog Sanctuary... this is a re-badged
Memorymoog Plus with a factory sound library tailored to
churches. Dave
Van Koevering, a maverick moog salesman from the early
days, arranged for a set to sell through his business.
Reportedly
there were 100 of these made. top
Features
The Memorymoog voice is heavily based on the CEM chipset. The VCO
is built from the CEM3340, VCA is CA3080, and EGs are CEM3310.
The lowpass filter is the classic Moog transistor ladder filter.
The Memorymoog is not multitimbral. Each of the six voices
consists of three VCOs, the Moog 24dB ladder filter, VCA, and
independent ADSR EGs for the VCF and VCA.
Be aware that the Memorymoog uses about forty CEM chips which are now
getting very rare and are running $50 and up apiece.
Each VCO has triangle, ramp, and variable pulse waveshapes which can be
combined (the only Moog synthesizer other than the modulars that had
this feature). VCO2 can be hard synced to VCO1 for nasty biting
sync sweep sounds. VCO3's keyboard control can be turned off and
can be dropped to LFO
mode like the Minimoog - this is a powerful feature in voice
modulation. The frequency control is an interesting (and USEFUL)
dual control with a fine and coarse control implemented with concentric
knobs, the smaller knob controlling fine adjustment. Only the
Oberheim SEM voice had this kind of control and it is very effective at
dialing in fine tuning offsets, and the resolution is much higher for
this control so you don't hear "stepping" like the Prophet-5 or
Oberheim OB-X/Xa/8. A proper mixer controls the levels of the
VCOs and
the white noise source, and an interesting feature of the mixer is you
can clip (or mildly overdrive) the level as you raise it past
"5". This not only gives you distortion effects, but you can
transform a triangle into a sine wave.
The 24dB/oct filter is the classic Moog transistor ladder filter and it
sounds excellent. My only complaint is instead of continuously
variable keyboard tracking with a knob, Moog used the 1/3 and 2/3
octave switches like the Minimoog.
A multi-waveform LFO (triangle, rising ramp, falling ramp, square,
S&H) can be assigned to any/all of VCO pitches, PW, and VCF.
The modulation amount can be preprogrammed with a separate knob or
varied with the mod wheel. The LFO frequency can't be modulated
(but this can be done using VCO3 as an LFO) and its range goes from
0.1hz
to 100hz.
The EGs are full ADSRs, one for VCF and one for VCA. A Keyboard
Follow button enables keyboard tracking of the transient times, IE the
higher you play up the keyboard the faster the attack/decay/release
times. This is not variable unfortunately but it was heady stuff
for 1982. A Release button turns off the release stage for
instantaneous release. Unconditional Contour forces the EGs to
complete the full ADSR stages regardless whether a key is held down or
not. Return To Zero forces the EGs to reset to full off in the
middle of an envelope if that EG is re-triggered. When using the
Memorymoog as a monophonic synth the EGs can be single or multiple
trigger, a nice feature for emulating monophonic patches.
There are two input jacks on the rear panel for CV controllers such as
control pedals, #2 is normalled to #1 so you can use a single
controller for both. You can use foot pedal
#1 for controlling volume, pitch, and/or filter, then foot pedal #2 for
mod amount and/or VCO2 pitch (think sync sweeps).
The Memorymoog doubles as a monophonic synth by pressing MONO, and you
can vary the number of voices from 1 to 6. All six voices in monophonic
mode gives you one of the hugest sounds in analog land, you get the
sound of eighteen VCOs and six Moog
filters all at once yielding a massive unison sound with few
rivals. The voice allocation
choices are flexible - cyclic, memory cyclic, reset, memory reset.
Cyclic
cycles through all six voices when you play the keyboard, Memory Cyclic
"remembers" the same voice if you repeatedly press the same key, Reset
always resets to voice one when all keys are released, and Memory Reset
is a combination of Reset and Memory Cyclic and is most effective when
using polyphonic glide.
Then we get to the REAL power of the Memorymoog... Voice Modulation.
The VCF EG and/or VCO3 can be used to modulate VCO1/2 pitch, PW, or the
VCF. The modulation amounts are variable and can be inverted. What's
the big deal? VCO3 can be put in LFO mode and when you route VCO3 to
the PW of the other two VCOs, you get independent LFO modulations of
the PW for a rich fat sound. If you use the standard LFO, the PWM of
all the voices will all be in sync; if you use VCO3 as an LFO, the PWM
will be independent. The sound is much thicker and much more animated.
For more fun, turn on keyboard tracking for VCO3 while it is in LFO
mode. Voice modulation is quite effective using the filter EG to
modulate PW on a per voice basis.
A couple of interesting buttons in the voice modulation are Invert and
Contoured OSC3 Amount. Invert is used to reverse VCF EG to
negative envelopes or to transform OSC3 falling ramp to rising ramp -
remember that VCO waveshapes can be combined so the invert function has
some interesting modulation options. Contoured OSC3 Amount routes
filter EG to OSC3 level so you can modulation OSC3 modulation level
with an EG - good for introducing transients or creating weird ring
modulation effects.
This is territory that the
Polymoog was not capable of. The Prophet-5's claim to fame was
its Polymod feature,
and the Memorymoog takes it even further.
An arpeggiator provides a lot of musical fun in the Memorymoog.
What is way cool is combining the HOLD button and the arpeggiator -
when you press a single key that comprises a chord under the HOLD
button, the arpeggiator cycles through each note in the chord.
The options are combinations of latched/unlatched of up, down, up &
down patterns, autotrigger, as well as first to last or last to first.
The sequencer (Memorymoog Plus only) is fairly rudimentary and I
haven't used it in years. You
can store six polyphonic sequences and six monophonic sequences in
memory, and the monophonic sequences can be routed to the external
interface jacks so you can sequence an external monosynth (complete
with scaling and range trimpots) from the Memorymoog. The sequences can
be in
step or in realtime, you just press record, start playing, and press
stop. You can specify the maximum number of voices so that you can have
some left over for playing along with the sequence. Pretty basic by
todays' standards but it was powerful for 1984 when it was released.
You can store 100 of your own patches. There is a program
sequencer which you can define program patch numbers
in a sequence which can be advanced or backstepped with a single button
or
footswitch. This was pretty handy when I gigged with this beast.
The Prophet-5, Oberheim, or CS-80/60/50 synths never featured an
arpeggiator or sequencer so this was a step up from older machines.
The five-octave keyboard has no aftertouch
or velocity sensing. A headphone jack has its dedicated volume
control for monitoring, and a programmable volume knob balances volumes
between patches. Patch dump is done with cassette tape
interfaces, unless you're lucky enough to own a LAMM. top
Cleaning
Keyboard Contacts
If random notes do not play on the Memorymoog keyboard, you have the
common dirty keyboard contact problem. This unit as well as the
Korg PolySix, Mono/Poly, SCI Prophet 600, and Oberheim OB-8 uses the
Panasonic keyboard assembly whose achilles heel is the rubber dome
keyboard contacts which get dirty with age and render a key inoperative.
This cleaning procedure is shameslessly lifted from my tech friend
Scott Rider and
is duplicated
here with changes relevant to the Memorymoog. This procedure
assumes you are competent with electronics and with disassembly of this
machine. The author is not responsible for damage to your
equipment or for any health incidents incurred as a result of this
procedure. If you question your skills at all, then you should
seek the services of a qualified service technician.
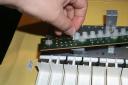
Step 1: Removing the Keyboard from the Machine
1-1: Make sure the unit is unplugged from the AC power line!
1-2: Open the machine and locate the keyboard's connector on the
left side of the keyboard assembly. Unplug this cable from the assembly.
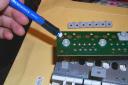
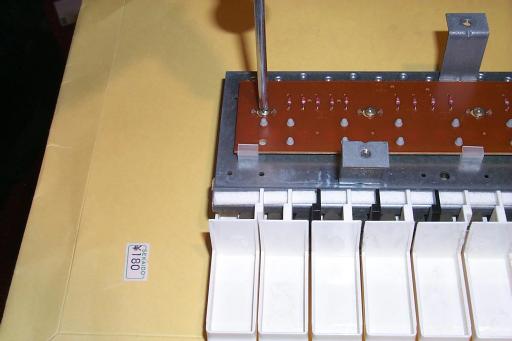
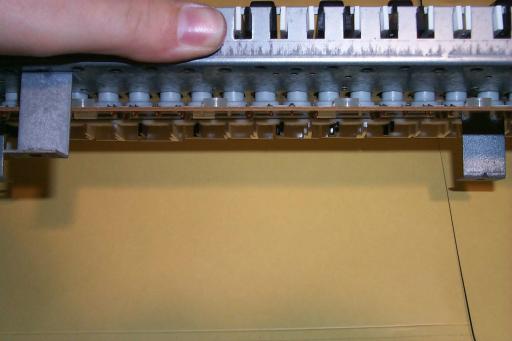
Step 2: Removing the Keyboard's Circuit Board
2-1: Place the keyboard upside-down on the work surface, oriented as
shown in
the following picture.
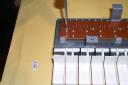
2-2: Using a Phillips screwdriver, remove the sixteen retaining
screws as shown above.
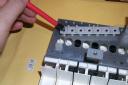
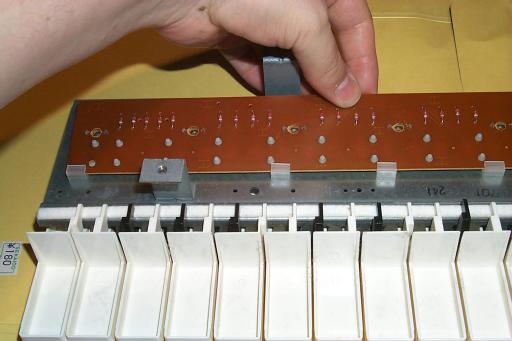
2-3: Lift the circuit board up at the back and carefully remove it
from
the retaining clips. This board is long enough that it becomes
flexible,
so be careful not to break it.
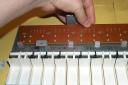
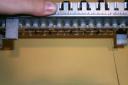
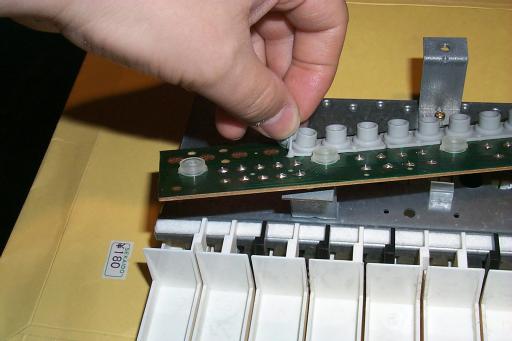
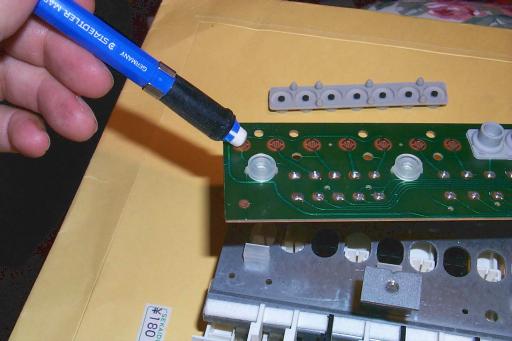
Step 3: Removing the Rubber Contact Strips
3-1: Holding the circuit board as shown, grasp the end of one of the
rubber contact strips (there are ten such strips on this keyboard; nine
6-cap strips and one 7-cap strip) and gently pull it up. It helps to
push
against the rubber "pins" underneath the board to get them to come out.
These rubber strips are more resilient that it might appear--after all
they have to stand up to millions of key presses--but even so take care
not to tear them. A strip comes out easily once it is started.
NOTE: I do not remove them all at once. I usually pull up one
strip,
clean the contacts as described below, and replace the strip before
pulling up the next one. This keeps things relatively neat.
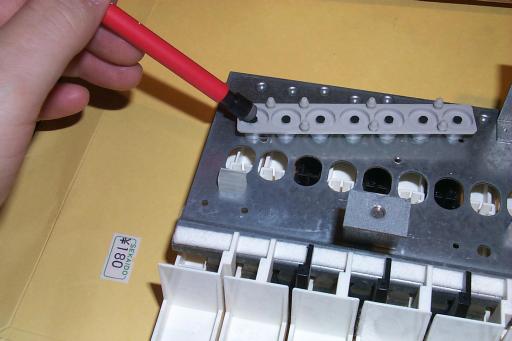
Step 4: Cleaning the Rubber Strip Contacts and Board Contacts
4-1: For each contact face, there are a few ways to do the cleaning:
Method 1) use a pencil eraser and gently
rub the black contact face
2 or 3
times as shown. This is the easiest solution if only a few contact pads
are
causing problems.
Method 2) use denatured alcohol and a
Q-tip swab to clean the
contact
face. These 'elastomeric' contact pads tend to dry out over time, which
causes a thim film to cover them. The idea is to rub the film
away. Don't overdo it, however.
Method 3) for cases where the majority of
contacts are failing, it
is best
to purchase a rubber keypad contact repair kit, such as the part#
CW-2605
available from Hosfelt
Electronics. Also get a part# CW-7400 'Gold Guard' cleaning pen
from
them as well, which can be used to clean the gold-plated contacts
described in the next step.
4-2: Now, similarly, for each gold-plated, interleaved contact area on
the circuit board, it is recommended to use a gold-contact cleaning pen
such as the 'Gold Guard' model offered by CircuitWorks and sold by
Hosfelt
Electronics as noted above. Alternatively, use a different
eraser than was used for the rubber contact pads and rub each area
2-3 times as shown, or use denatured alcohol and a Q-tip swab. Don't
rub
the gold plating off!
4-3: Make sure no eraser crumbs are still present, then press-fit the
rubber contact strip back onto the board. A properly-seated strip will
not be 'pulled' or 'buckled' in appearance.
4-4: Repeat steps 3 and 4 until all the contact areas have been
cleaned.
Step 5: Keyboard Reassembly
5-1: Align the board with the keyboard frame. The end with the cable
connected to it goes on the right if the keyboard is oriented as shown
in
the above images. Hook the front edge of the board under the retaining
clips. Be sure that all the clips are in place and holding the board.
(The clips can slide out if you pick the keyboard up without the board
installed, so be careful).
5-2: Pay attention here, this can be tricky.
Align the rubber caps with
the holes in the keyboard frame, checking to make sure every
cap
fits in its respective hole properly as shown. These caps tend to hook
the edge of a hole and scrunch up underneath the keyboard frame. Use a
blunt tool (I use a plastic TV IF transformer adusting tool) to coax
finicky keycaps into place if necessary. Do not use anything with a
sharp
point like a pencil which could tear the keycap.
5-3: Once the keycap fit for each key is verified the board can be
refastened with the sixteen screws.
At this point the keyboard can be placed back in the machine and
its
cable reattached to the circuit board. Do not bolt the keyboard back
down
just yet. Restore the keyboard connector to the assembly and
apply power on the machine. Select a
decent patch and play every note on the keyboard to verify that it
sounds.
if a key seems 'sticky' or otherwise unresponsive, note which key(s)
this
happens on and go through the cleaning procedure again for those
specific
key contacts. It will take a minimum of deduction to remove the correct
rubber strip and clean the correct contacts. Eventually, all the keys
will be working fine again.
After all the keys are working satisfactorily, power off and unplug
the
machine, and reassemble the Memorymoog. top
Comprehensive
Tuning Upgrade
Standard disclaimer: this is not
a job for the
novice. This procedure
assumes you are competent with electronics and with disassembly of this
machine. The author is not responsible for damage to your
equipment or for any health incidents incurred as a result of this
procedure. You should have excellent
soldering/desoldering skills and experience with double-sided PC
boards. The Memorymoog has many cable bundles that are vulnerable
to damage. If
you question your skills at all, then you should
seek the services of a qualified service technician. For an
online primer
see http://www.synthtech.com/tutor/tutor1.html
This upgrade involves
removing DIP
sockets and header pins - tedious work which can
damage the PC board if you are not careful. A good soldering iron is
definitely recommended. You'll need desoldering tools (wick or
solder-sucker) to remove the parts. In most cases you'll have to
physically destroy the DIP sockets to get them out. The trick is doing
it without damaging the PC board pads and traces. If you've never
removed parts like these before, start with the voice cards since they
are single-sided boards.
Before you install the new
parts, apply flux to the pads so that you
get a clean solder joint, and clean up the excess flux with flux
cleaner. I use a brush to apply flux cleaner and a wadded paper towel
to soak up the residue, using a towel fresh surface each time. Good
lighting makes a difference here. If you don't clean it up, leftover
flux will cause problems down the road like low-impedance shorts across
PC board traces.
Wear a ground strap or do
your work on a static-safe mat. You're going
to be working with irreplaceable static sensitive components. The CMOS
and CEM chips are safer in their sockets on the boards.
I used a Panavise with a PC
Board clamp so that I can work with both
hands free, which helped a lot. Some of the MM's boards are too big to
fit this clamp.
I suggest that you work
with one board at a time and confirm 100%
functionality after rework before you move to the next board.
I also suggest that you
label plugs with a permanent marker as you
remove them, IE S11E or P16E for voice card "E". There are too many
places to plug the wrong connector and too many connectors to get mixed
up.
Remember that when you
install a new part that you have to have proper
solder fillets on the pads of *both* sides of the double-sided PC
board. If you're good enough with the iron and apply the solder to the
pin and not the tip of the iron, the solder will flow well enough to
make a fillet on the other side by itself. Note that only the voice
cards are single-sided.
Some connectors have a
"key" so that you don't orient the plug the
wrong way. The mating header simply has a pin (and PC board thru-hole)
omitted where the "key" is. In your new part you can pull out a pin by
heating it and pulling it out of the header strip as the plastic
softens.
Do not handle any of the
gold plated parts with tools. The plating on
the pins is extremely thin (10 or 30 microns) and can be destroyed if
you scrape it with metal tools.
----------------------------------
The Memorymoog has a history of
problems with tuning. If your unit has
to be calibrated more than once a year, or the calibration values get
noticeably worse each year, or the tuning changes from day to day, or
the monophonic mode is out of tune with the polyphonic mode, or the
tuning changes with any movement or impact (just hold a note and hit
the case with your fist), that is the result of multiple causes:
- Oxidation on the
connectors inside the Memorymoog. There are almost 100 connectors
inside these beasts, which aid in servicing but are a frustrating
source of malfunction.
- failing range/scale trimpots
on
the voice
cards cause tuning problems. On the resistive elements of the trimpots,
the precise area where the wiper contacts corrodes over time and will
no longer work reliably.
- untinned leads on the tuning
trimpots. Believe it or not, I removed trimpots from the
voiceboards - by hand!!! Moog didn't pre-tin the leads on the
trimpots, so they never made a proper connection to the solder
fillets. You have to tin the leads, remove the old solder
fillets, and re-install the trimpots.
Replacing
Connectors and IC Sockets
The connector contacts in
the MM are tin-plated. Over time, oxidation
forms on the contact surfaces in the form of an impedance, which 1)
varies with humidity and temperature, and 2) is non-uniform over the
contact surface, where simple movement changes the impedance. The
consequence is that you lose voltage across these oxidized contacts.
The polyphonic control
voltages that drives the voices cards travels
through three boards (six connectors), while the monophonic control
voltage goes through four (eight connectors). If ONE OR MORE of these
connector contacts has oxidation, the control voltages are degraded.
Note the emphasis; at worst there will be six points where the
polyphonic CVs are losing voltages across the connectors. This is the
primary cause of the MM's tuning problems. To add to the problem, these
critical voltages are carried over ribbon cables via DIP16 plugs, and
the mating sockets in the stock MM are poor quality for analog signals.
You can verify this with a DMM; probe the signal at the DUMX board and
at the voice card where it terminates, if you measure any voltage drop
then you're seeing contact loss.
Power busses are equally
vulnerable, if the voltages aren't stable no
amount of calibration will help. TTL logic signals (d*g*t*l) with their
built-in interim zone between high & low are insensitive to these
losses and generally don't have a problem.
As a temporary fix, the
contacts can be cleaned by periodically
removing/re-inserting the plugs as to "scrub" the oxidation off, or
they can be shined up using an eraser.
Ultimately the contact
surfaces will corrode beyond cleaning. I am the
original owner of my MM, and it took less than ten years for this to
occur. I was now faced with having to replace connectors.
During that time, I had
acquired an ARP Pro-Soloist which predates the
MM by ten years. It had laid dormant, yet was perfectly in tune and
100% functional when I powered it up. This is an instrument that is
over twenty years old yet at half its age was in far better health than
my MM. My interest piqued. Closer inspection revealed that the
connectors used in the ARP were a combination of tin plating and gold
plating, IE the pins were gold plated while the contact inserts in the
mating plug were tin plated.
Before starting ARP, Alan
Pearlman designed and built amplifier
assemblies for the space program and the military. I also have many
years of experience in military electronics. The military demands
reliable equipment, and the standards mandate that all connectors
contacts have gold-plating; tin plating is not acceptable. Al's
experience with military electronics carried over to his synthesizers
and is a big reason why his instruments were more reliable.
Connectors with tin-plated
contacts are rated for ten years, while
gold-plated contacts are rated for TENS
of years. Gold also does not
oxidize. In my experience, I've found
that the most
reliable equipment either have the fewest connectors or the connectors
are high quality.
My first impulse to fix my
ailing MM was to replace every
tin-plated
connector contact and pin with gold-plated equivalents, but there was a
problem. The gold-plated contacts for the AMP MTA plugs used in the MM
couldn't be found in any catalog and were available only from AMP in
lots of 10K, and AMP only produced a stock when the demand justified
the expense. You also need a special insertion tool for the MTA plugs.
However the ARP
demonstrated that you can get years of reliability at
reasonable cost by combining gold/tin platings on connector systems. So
I decided to focus my efforts on replacing only the connector pins and
DIP sockets on the PC boards and leave the plugs as is. This was more
cost-effective in parts and in labor, and the parts are easier to
locate. I also minimized my work by targeting only those connectors
which carried any analog signals, since logic signals weren't a
concern. You can find this info in the master connector chart on the
MM's schematics, which you'll need for this work. If you need
schematics you can get them from the world famous Mark Glinsky Manual
Manor.
----------------------------------
For the MM, you'll need to
find a source for header strips with
gold-plated pins on 0.100 centers and 16-pin DIP sockets with
gold-plated contacts. These are not hard to find in catalogs or online.
I got lucky and sourced gold-plated parts at a surplus shop. I
recommend Augat DIP machined sockets if you can get them. You can buy
header
strips with 40 or so pins which can be cut into the quantity you need.
Side cutters work well, although occasionally you'll lose part of a
pin. Buy more than you need. All together, you'll need 42 DIP16
sockets, more than enough header strips for 305 pins, and header strips
with right angle pins for 32 pins (you might get away with the straight
pins but I don't know how it will clear when put back together).
If you can find them (and
let us know where 'cause I would really
really like them for mine), you'll want new headers for the power
supply board. These are the larger pins and are 0.156 centers. You'll
need a 15-pin strip and three 3-pin strips. I have yet to find a
catalog (Mouser, Digikey, etc) that carries these.
The complete list of
connectors to replace is:
Voice Cards A-F (x6): S11,
S12, P13, P14, P15, P16, P17, sockets for CEM3340s (x3)
Common Analog: S21, S22,
S23, P25, P26, P27, P29
Contour/Glide: S32, S33,
P31, P34, P35, P36A-F (x6)
Digital: P40, P48a, P48b
DMUX (big one!): S53, S54,
S55, S56, S57, S58, S59, P511, P512, P514, P515A-F (x6), P516, P517,
P518, P519, P520
RSC: P63, P64
LSC: P76, P77, P78
Power Supply: P131, P132,
P133, P134
Keyboard: 16 pin right angle
Note that the LAMM update
from Lintronics does not include this work.
If you have an older MM,
you may need the reliability updates that Moog
Music has issued, the complete list of service bulletins are online at http://www.memorymoog.com/.
Altogether this can take
over 40 hours of work, but the reliability
improvement is worth it. In the years since I have done this to my
MM, *none* of the tuning problems have surfaced. I recently checked the
calibration, and the oscillator range is slightly off but the scaling
is *rock solid*.
Failing
Trimpots
Here's another MM foible:
failing range/scale trimpots on the voice
cards cause tuning problems. On the resistive elements of the trimpots,
the precise area where the wiper contacts corrodes over time and will
no longer work reliably.
You can unsolder each
trimpot, rotate them 180 degrees on the PC board,
and resolder them. By rotating them you will have to set the resistance
to its previous value, but it will be no longer around the corrosive
area. You will have to perform major oscillator re-calibration when you
do this, because they will be WAY out (hint: don't use the C-7 routine.
Calibrate the oscillators by ear with a reference).
Of course you can only do
this once. After that it's time to spring for 36 new trimpots.
top
----------------------------------
This
beast has
been my number one axe for years and it is the standard against which
every
polysynth is measured in my book. I've tried to find a smaller lighter
polysynths that could replace the Memorymoog but they all come up way
short. Not the Oberheim OBMx,
not the Matrix, any VA, etc. Only the Alesis Andromeda comes close to
it, and
I've successfully duplicated many Memorymoog patches in the Andromeda.
Even though the Andromeda now replaces at least four keyboards on
stage, I am still hanging on to the old stuff. I'm just too attached to
it. It's my favorite synth and I'm forever learning how to get new
sounds on the thing.
Of any of the Moog synths ever made, the Memorymoog does the best
Minimoog impersonation. It's got that big bad Moog sound. It's a lot of
machine just for basses and leads, but it's fantastic for FX, pads,
rezzes, strings, brass, etc I can get a LOT of sounds from this. The
key is the voice modulation feature. "Brawny" is the best way to
describe the Memorymoog because it sounds so big and strong.
This thing will get
ANY analog synth sound
from the 70s and 80s, it is THAT versatile. I've been using the
Memorymoog to cover songs by ELP, Styx, Rush, and many many others.
It's been my workhorse for YEARS. I've even used some string and
tympani sounds with a community orchestra band and it sounded fine. I
wish it had some aftertouch in the keyboard though.
But... the Memorymoog is one fragile creature. I gigged with mine with
a flight case for years yet the tuning and reliability went to hell.
There are two problems: the trimpots fail and the connectors oxidize.
The Memorymoog is FULL of connectors and Moog Music used really crappy
ones. When mine wouldn't hold its tuning or calibration anymore, I
ripped out selected connectors and replaced them with gold-plated ones
for a phenominal reliability improvement.
Moog issued quite a few factory service bulletins to correct problems,
which you can find here
(warning large PDF file).
The Memorymoog is THE
classic polysynth to
own but you'd better be prepared for the cost of maintenance. You'll
need to range and scale all eighteen VCOs once a year, and if it gets
worse than that then I suggest the connector remedy described above. If
you keep it tuned up like a fine import motorcar, the Memorymoog will
reap many rewards. It's pretty heavy too, weighs about 80 pounds.
You'll want a sturdy stand for it.

Looking for Patches?
Home