Tascam 246 Portastudio Cassette Four Track Multitrack
Recorder/Mixer
Last Update 07/26/2026
I purchased this Tascam 246 new in 1989 at the humble start of my
recording studio. I had graduated from college and had a full time
engineering job, so I embarked on my hobby of recording original
songs. "Portastudio" cassette recorders were a hot product in the
1980s, before computer sequencers and DAWs became the norm. Many of
them were not well featured; most only recorded two tracks at a
time, the channel strips were too simple, no transport memories for
rewind/stop/play, no punch in/out feature, the standard cassette IPS
transport was noisy and not full bandwidth, and there was no
provision for effects busses.
This was before I got involved with MIDI. Back then I owned a Kustom
88 Electronic Piano, Hammond
Porta-B, Moog Source, Moog
Liberation, Moog
Memorymoog, and Moog
Polymoog. Processors were an ART ProVerb (ugh) and Moog EQs. I knew my way around a FOH mixer and
had done some recording on crude reel-to-reel recorders; the 246 had
an impressive feature set that satisfied my desires at the time, and
offered functions for future exploitation. Six channels with dual
sweepable EQ, inserts, dual FX busses (one buss send with in/out
switch), overload LED, and are assignable to any/all track/PGM
busses. The unbalanced channel inputs are 1/4" jacks on the front,
and each has a 1/4" TRS insert jack. The first four channels can
accept signals from the front panel inputs or each track for
"remix", the remaining two channels accept either the front panel
inputs or the Line "B" inputs on the rear channel. The channel input
selectors include an OFF position that serves as a mute. There are
no XLR or balanced inputs, or PFL functions.
Four tracks can be recorded at the same time and any of the mixer
channels can be assigned to any/all tracks, which permit easy
"bouncing" of multiple channels to a single track. The tracks use
dBX companders for noise reduction and you can defeat dBX on all
tracks or just track 4; I would later exploit track 4 for the SMPTE
stripe to sync to the software MIDI sequencer on my computer, using
the very capable MusicQuest MQX-32M interface card. You can still
find new interfaces with SMPTE I/O. The DBX NR LED in the
master section is steady on if dBX is enabled for all four tracks,
blinks if track 4 is disabled (for SMPTE syncing), and off if dBX is
disabled on all tracks. The dBX companding noise reduction has
worked really well, I have never noticed any audio anomalies in
operation.
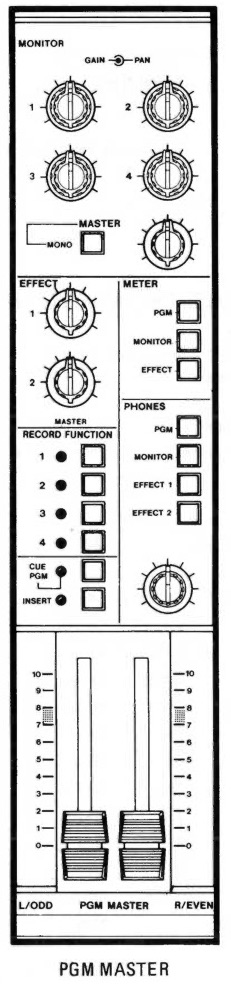
The master program section was powerful for its time. PGM busses
serve two purposes; for recording to any track(s), or for stereo L/R
mixdown. The rear panel provides inputs and outputs of the PGM buss.
The MONITOR controls are intended for control room speakers to
monitor any of the four PGM busses or tape tracks; L/R pan position
and gain for each PGM/track can be set independent of the channels,
can be summed to mono, and a master level control is provided.
Master effects send levels are provided, which are routed to the
rear panel Effects 1 and 2 outputs. The two headphone outputs can
monitor PGM, Monitor, Effect 1, or Effect 2 busses. RECORD FUNCTION
switches enable each tape track; the LEDs blink to indicate that the
tracks are armed but not active when the PLAY button is pressed,
then when the RECORD and PLAY buttons are pressed, recording is
active and the LEDs stay lit.
Punch-in/out is available, but the action is not automated and there
isn't a way to mute a track between punch locations while
rehearsing. The INSERT switch has to be depressed to enable
punch-in/out. You have to manually press RECORD to start the
punch-in then STOP for punch-out (risky), or you can use a
footswitch with the rear panel INSERT jack to control punch-in/out
with your feet (better). Set the CUE/PGM in CUE mode and use the
MONITOR section when performing punch-in/out (see next paragraph).
The CUE/PGM switch is a little confusing; with the button depressed
(PGM mode), PGM busses are routed to the MONITOR section. With the
button not depressed, CUE mode is active for the MONITOR section;
what you hear through the monitor section is a function of the
INSERT button, RECORD FUNCTION button(s), and which transport mode
is active.
- If the INSERT button is not depressed, the monitor source is
tape tracks in PLAY or RECORD mode if all RECORD FUNCTION
switches are off; if any RECORD FUNCTION switches are on, then
the PGM busses are the monitor source in any transport mode.
- If the INSERT button is depressed and all RECORD FUNCTION
switches are off, the monitor source is tape tracks; if any
RECORD FUNCTION switch is on, the monitor source is tape tracks
in PLAY transport mode, while monitor source is PGM in RECORD or
RECORD/PAUSE transport mode.
- If the INSERT button is not depressed, toggling any RECORD
FUNCTION switch will toggle between tape and input signals for
rehearsing punch-ins.
Metering is generous. Each channel has overload LEDs (only active
with the input selector in "mic/line" position). There are large VU
meters for each track/PGM buss, with peak LEDs. These are effective
for displaying average audio volumes (the meter needle) and the
absolute peak audio volume (the peak LED). Both provide level
functions the other does not. Two smaller VU meters (no peak LED)
display the levels of the PGM L/R buss, Monitor L/R buss, or the
Effects 1 and 2 buss.
The manual recommends using 90 minute cassettes or shorter.
Cassettes longer than 90 minutes are not recommended because the
tape is thinner and can lead to problems with breakage and/or
wrinkling with the transport system. Do not use metal tapes as the
material will prematurely wear out the playback/record heads. Only
one side of a cassette is used, as the four tracks occupy the full
width of the tape. The 246 is adjusted for high bias 70us EQ type II
tape. Tapes from earlier Portastudio devices using Dolby noise
reduction will not reproduce properly; you have to disable dBX and
reduce the high frequency in the 1K to 8Khz range. Track formats and
widths vary among other non-Tascam portastudio systems, and may not
reproduce at all (don't expect tapes to be interchangeable). The
transport on the 246 can operate at the standard 1-7/8 IPS cassette
speed or double speed 3-3/4 IPS for lower noise and better fidelity,
and the pitch (tape speed) can be varied plus or minus 12%. Since
only one side of a cassette can be used, a 90 minute cassette gives
you 45 minutes of recording time, or 22.5 minutes at double speed. I
have had excellent results using Maxell XL II tapes (amazingly they
are still available!).
The bandwidth is better using the HIGH SPEED 3-3/4 IPS setting, but
the mixer could be better; the channel inputs are unbalanced thus
the mic preamp is sufficient for demos but I've gotten better
fidelity using outboard preamps. The mixer seems to mush up the
stereo image when mastering. So for the better recordings (such as
live performance) I had used the band FOH mixer for the better mic
preamps then routed the subgroup outputs to the 246 inputs with the
gain set to line, and performed post-processing/mixing using the
rear panel TAPE OUTPUTS routed to an external mixer.
Transport memories permit looping and locations for play or rewind.
A ZERO RETURN memory can be set at any tape location and configured
to STOP, PLAY, or do nothing (OFF)when the zero location is reached.
Note that the counter in the display may roll over zero. MEMORY is
non-zero tape location and can be configured to STOP, REWind, or do
nothing (OFF) when the memory location is reached. The ENTER button
sets the memory location, CHECK display the location in memory. Use
zero/PLAY and memory/REWind to configure the looping action. If TRT
button is pressed, the display shows the time instead of an abstract
counter location. The difference is the counter will both increment
and decrement, while the time display will only increment. Time
display is useful for learning the time length of a program, or for
learning how much tape remains on the cassette. RESET clears all
memory locations. The only downside is that over each repetition,
the actual tape location(s) drifts from the memory locations - there
is no precise synchronization with the transport. This drift
is caused by inertia of the cassette reels from an abrupt stop
during rewind operation, resulting in overshoot; the transport does
not gradually reduce speed as the location is approached.
The rear panel I/O is pretty generous. Besides the aforementioned
inserts, there are direct outputs for each tape track, Line "B"
inputs for channels 5 and 6, PGM I/O for busses 1 through 4, Monitor
L/R outputs, Effect 1/2 outputs. The PGM I/O can serve as I/O to
your DAW audio interface. Effects busses can be configured by
setting the send levels in the remix channels 1 through four,
routing rear panel Effect output(s) to the input of your effects
processor(s), routing the output of your effects processor(s) back
to the Line "B" inputs as an effects return (which bypasses the mic
preamp and trim control), then mixing effects with the remix'd
tracks during stereo mixdown.
Not a bad system for a Portastudio, quite flexible. While it isn't
going to support a large studio, it's an ideal package for a bedroom
or office size electronic music studio. Today I use mine for a
"scratchpad". These are now being sought out by EDM artists.
This packs a lot of circuitry so it isn't light at 23lbs (10kg). I
acquired the optional RC-71 remote
control which extends play, stop, record, fast forward, etc
transport controls up to 16 feet away from the 246. Handy as my
studio grew to the point that the 246 was not within reach.
Over time, I grew to hate the RCA I/O rear panel jacks. They are the
Achilles Heel of Tascam Portastudio machines - while they are
economical, they are unreliable. While I make my own cables, I have
never found any RCA plug that made a reliable contact with both the
tip and the shell.
Two age related problems will occur with the 246 and tape-based
recorders. One is drive belts, which dry with age and will break.
The other is dry lubricant, which hardens and renders the tape
transport inoperative. If you encounter the latter issue, stop
operating the machine before the irreplaceable motors burn out and
arrange for a competent tech to restore operation. This is not a
repair job for the novice, and disassembly/assembly is complicated.
The playback and record heads can wear down with extended use
depending on the hours of operation; replacement heads are not
available. The tape heads have to be periodically "demagnetized" or
"degaussed" since they gradually accumulate magnetism as tape passes
over the heads. The excess magnetism affects fidelity. Degaussers
are still available but I highly recommend one that is a cassette
assembly that "plays" in the transport and automatically performs
the process.
NEVER use paint thinner, alcohol, benzine, or any other cleaner that
are not designed for any component in the path of the tape. The
wrong solvent will damage them beyond repair. Teac/Tascam no longer
offer cleaning solvents - I discourage acquiring NOS Teac cleaners
because the chemical contents change over time. Metal plated
components like tape heads and pins need a different cleaner from
the rubber pinch rollers. User rubber cleaner for the rubber
components. Some discussion forums suggest 99% isopropyl alcohol for
the metal plated components but that conflicts with the 246 user
manual, when I find a better authority then I will update this page.
Tascam introduced larger Portastudio tape-based models with expanded
features. One model even used a reel to reel tape system. But the
246 and smaller models are the ones in demand on the used market.

Home